
Creating an SVN Repository and Connecting with SVN+SSH
A tutorial on how to create an SVN repository on your CS account and how to connect to it through Subclipse, using SVNKit.Introduction
You have been added to a group based on your CS login account. To check what group you are apart of, run:
:~$ groups
from the command line. You should be a part of one of the following groups:
- cs351f13a
- cs351f13b
- cs351f13c
- cs351f13d
- cs351f13e
- cs351f13f
- cs351f13g
- cs351f13h
- cs351f13i
You have not been set up with an actual SVN repo. You need one person in your group to create an SVN repository in their directory, make it readable and executable to the group your team is a part of, and then all will be able to connect to it from Eclipse. This tutorial will explain how to do it all.
Prereqs
Subclipse and SVNKIT must be installed in Eclipse. If you need help with this, check out the tutorial I wrote that shows how to get Eclipse working with SVN. If you still need help, try installing the latest version of Eclipse: Keplar. If you STILL need help after that, computers suck.
Steps
Choose 1 Team Member to Create an SVN Repository
NOTE: For the purpose of this tutorial, I will be using bradykey as the user. bradykey is a part of group cs351f13a. Make sure to change these variables to your login name and group.
Log into moons.cs.unm.edu or trucks.cs.unm.edu. Run:
bradykey@moons:~$ svnadmin create --fs-type fsfs svnrepository
This creates a dir /nfs/student/b/bradykey/svnrepository.
We now need to change the permissions of this /svnrepository folder to give read/write/execute permissions to the owner and group ONLY. To do this, run:
bradykey@moons:~$ chgrp -R cs351f13a svnrepository/
This changes the group to be cs351f13a.
However, others (not owner or group) still have access. To change this, run:
bradykey@moons:~$ chmod -R 770 svnrepository/
Now, only the owner and those in the group can have access to this dir.
Switch Default SVN Interface in Eclipse to from JavaHL to SVNKIT
The default SVN Interface in Eclipse is set to JavaHL. We want to switch this to SVNKit so that we have access to an SVN repository through SSH. (The SVNKit adapter should have been installed along with Subclipse if you followed my tutorial.)
Go to Eclipse->Window->Preferences->Team->SVN and change the SVN Interface to SVNKit.
Simple.
Connect to the New SVN Repo Using SVN+SSH
Go to your SVN Repository Exploring perspective and add a new repository location. The URL will be:
svn+ssh://YOUR_CS_USER_NAME@moons.cs.unm.edu/nfs/student/b/bradykey/svnrepository
NOTE: The directory path will NOT be /nfs/student/b/bradykey/svnrepository but instead will be the value returned by running :~$ pwd on the command line of the team member that created the SVN Repository.
A window will pop-up asking you for your ssh login credentials. This is just like if you were sshing into your account using putty. It is expecting YOUR CS login password.
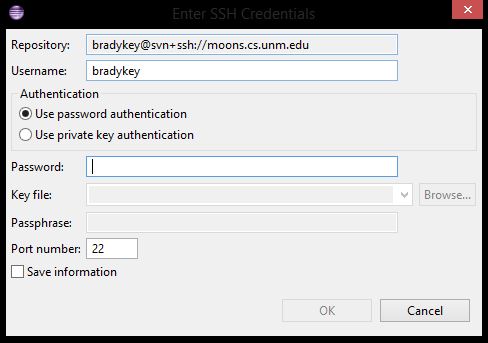
Trust the RSA key when it asks.
One more window will pop-up asking for another password. This can be ANYTHING, just like in lab. Since the /svnrepository directory has already had the group permissions changed, we don't need to pw protect the .repository file.
You are officially connected to your newly created SVN repository. Checkout and start coding.
Now.