A CLIMBING GUIDE TO LAS PALOMAS PEAK
(click here for a Postscript version)
Bernard M.E. Moret
May 15. 2003
In loving memory of my dear friend and climbing partner
Jane Tennessen (1962-1996)
who died on Warpy Moople in the Sandias on June 23, 1996
CONTENTS:
WHAT'S THERE:
In brief: around 100 sports routes on limestone.
Palomas Peak (8,250ft) is a minor peak in the Sandia massif.
As in the Sandia Mountains proper, the top layer of Palomas is
limestone, forming in this case two separate cliff bands; the higher
cliff band (at around 8,000ft) is the developed Palomas crag,
although the lower cliff band is seeing some limited development.
(This guide only covers the upper cliff band; the lower
band has few routes, is exposed to rockfall from activity on the
higher band, and features rock of much lower quality.)
The limestone is of good quality, with very sharp, highly textured surface;
taping up for cracks is mandatory and frequent resoling necessary.
Be prepared for a lot of smearing and edging and for small holds.
The crag has two flavors: one area at the south end is very steep and
features hard (12s and 13s) overhanging climbs, while the rest is a mix
of natural-pro cracks and bolted, nearly vertical slabs; the latter are
the most characteristic feature of Palomas.
The cliff band varies from 30ft to 70ft, with most climbs in the 50-60ft
range. All sports climbs (and several crack climbs) are equipped with
lowering anchors (mostly two bolts and chains, but also welded coldshuts
or rap hangers). All bolts are 3/8" steel; anchors use at least
3" bolts, while clips use at least 2.25" bolts.
Some of the anchors are accessible from the top (and there are
breaks in the band that will allow you to scramble up or down),
but exercise extreme caution: there is no rim trail; the top of
the cliff is a sloping shelf with loose dirt and gravel and many loose blocks
of all sizes; and anchors are typically set a foot below the ill-defined rim.
Thus, if you want to toprope a climb, it is best to find someone willing
to lead it and set up a toprope for you. Remember that lowering anchors
are just that -- they are not intended for use in toproping (the constant
friction of the rope causes premature wear on the anchors): if you want
to set up a toprope, use a pair of quickdraws on the anchors.
HOW TO GET THERE:
From Albuquerque, take I-40 east, exit at Tijeras (Exit 175) and head north
on NM 14 through Cedar Crest; after about 6 miles, turn left onto the Sandia
Crest road (NM 536); soon after passing the ski area base (about 9 miles
after leaving NM 14), turn off right (at Balsam Glade picnic area) onto dirt
road leading to Placitas;
after about 2 miles, stop at left turn with 3 concrete barriers west of the
burn area. (If you get to Las Huertas picnic ground or the Sandia Man Cave,
you have gone too far down.) Drive time is 40-50 mins.
From Santa Fe, you can take I-25 to Placitas, exit to NM 165 and drive 14
miles to the parking area (the last 5 miles on dirt), but it is faster
to take NM 14 south to the junction with the Sandia Crest road and proceed
as above.
Parking is limited and often a severe problem on week-ends:
there is room for 8--9 cars at the 3 concrete barriers
if you park perpendicular to the barriers; about 40m down the road from
the turn, there is room (sideways) for 4 more cars on the uphill side;
note that rangers will ticket any car that impinges upon the roadway.
PLEASE CARPOOL and PARK WELL!
Take trail right by the barriers; follow it across the burn area and through
the forest, on a mostly level course, to a dry creek bed; at the creek bed
turn sharp left onto an ascending trail that takes you to the corner
of a large clearing. The first turn on the left (sometimes barred),
just before entering the clearing, puts you on the trail to the
lower cliff band.
The second turn on the left, just after entering the clearing
and thus only 10 yards beyond the first turn, puts you on the trail to
the upper cliff band.
Allow about half an hour for the hike up with a full pack.
Please stay on the trail: the native flora is easily damaged.
From December till March, expect hazardous driving conditions on the dirt road
(often only accessible from the Placitas side),
possibly deep snow on the trail (bring mountaineering boots or snowshoes),
and cold temperatures, although the rock dries up quickly and stays warm
in the sun.
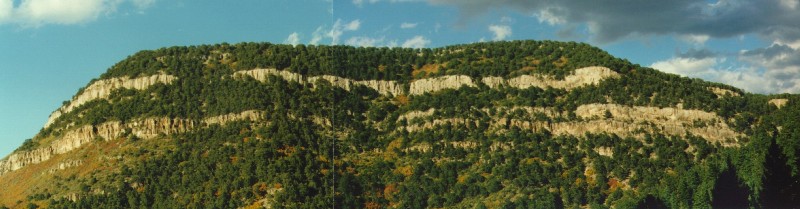
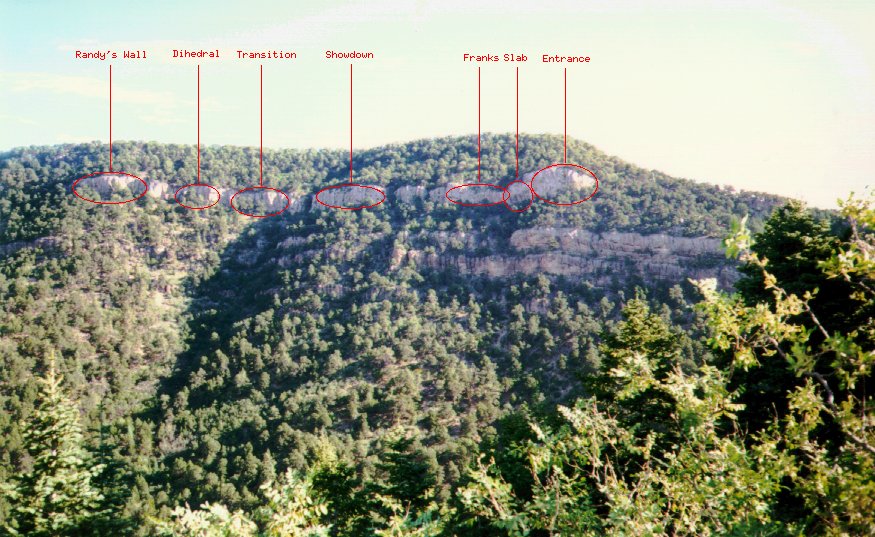
The cliff band as seen from the road; click on the image to get
a large annotated version
More bolted routes can be found by Sandia Man Cave (a bit farther down the
dirt road from the Palomas parking area).
The front side of the Sandias has some bolted routes; about
7 miles south of Tijeras on NM14 is Big Block crag, with a few good
bolted lines. Farther south are New Canyon (30 miles
south on NM14 in the Manzanos), Socorro's Box
(60 miles on I25), and Datil (2.5 hrs drive); to the north are Cochiti
Mesa/Cacti Cliffs (1 hr drive), the crags of White Rock
and Los Alamos (2 hrs), Las Conchas in the Jemez Mountains (2 hrs),
and El Rito between Espanola and Abiqiu (2.5 hrs). Together, these
areas offer nearly 500 bolted sports routes, with limestone, basalt,
welded tuff, granite, and quartz cobbles, all within a day's drive
from Albuquerque.
THE CLIMBS:
Climbs are listed south to north as encountered on the crag trail.
(Several crack climbs with natural gear are not listed here.)
My rating scale is a follows:
| 1 |
avoid |
|
4 |
very good |
| 2 |
indifferent |
|
5 |
a classic! |
| 3 |
worth doing once |
|
- |
not rated |
Both quality and difficulty ratings are based on input from a group of about 15 people.
When the difficulty is height-dependent, I have used a slash mark
to indicate the fact; in all but one case, the higher difficulty goes
for the shorter climber (the exception is Pretzel Logic, which is
harder for taller climbers). Ratings are consistent with other areas in
central New Mexico, but visitors often find the delicate balance and precise
footwork challenging. All ratings for face climbs assume that any adjoining
cracks are off limits.
I would very much appreciate feedback on ratings and grades: send email
to moret@cs.unm.edu.
First ascentionists are identified by initials:
| TF | Tim Fairfield |
|
MT | Mark Thomas |
|
BP | Bryan Pletta |
| LH | Lance Hadfield |
|
RE | Randy Eisler |
|
DP | Dave Pegg |
| LR | Lewis Rutherford |
|
EG | Eric Gompper |
|
JT | Joey Tefertiller |
| DE | Deborah Evans |
|
LN | Lorne Raney |
|
CG | Chris Grijalva |
| BM | Bernard Moret |
|
SH | Steven Hofmeyr |
|
PM | Paul May |
Many thanks go to all these people, but most of all to Bryan Pletta and
Mark Thomas, who put up nearly a third of the 100-odd climbs listed below
and who are always willing to take time to help other climbers.
The crag has two flavors: one area at the south end is very steep and
features hard (12s and 13s) overhanging climbs, while the rest is a mix
of natural-pro cracks and bolted nearly-vertical slabs; the latter are
perhaps the most characteristic feature of Palomas.
The Entrance:
You may miss this climb the first time: it is about 25 meters before the
trail levels out along the cliff band, in an alcove slightly above the
trail itself.
- 2
-
Double Ds (Mark Doughty/Dave Anderson): 5.11d; 4 bolts, anchors;
a long boulder problem with a fingery crux; many drilled holds
about 25 meters farther north:
The following five climbs are located just as the trail levels out along
the cliff, with Entrance Exam immediately after the turn to the right.
All are on vertical to slightly overhanging rock, before the seriously steep
Slab Wall.
- 3
-
Entrance Exam (BP/MT): 5.10c; 6 bolts, rap hanger anchors;
pleasant to 4th bolt, then easy moves on hollow-sounding rock: beware of
dislodging some of the junk -- ask your belayer to step around
- 4
-
Sidewinder (BP/MT): 5.12b; 9 bolts, anchors;
starts next to Entrance Exam and moves straight up, passing just
right of the large cave;
one of the longest routes at the crag, with a gentle, but continuous
overhang; two cruxes, first on a long reach left for the 6th bolt,
second at the 7th bolt (use your right arm around the block!);
a brutal endurance test
- 5
-
Nature of the Beast (LH/JT): 5.12a; 8 bolts, anchors; left of the
large cave with old raptor nest; hard start, easier middle, somewhat
pumpy top, with short runout to the anchors that gets easier as you go
- 4
-
Drop in the Ocean (LR): 5.11c/d; 8 bolts, anchors; jam through the
first 4 bolts (optional #2 Camalot below the 1st bolt to protect on the
choss) to a no-hands rest in a scoop, then nice moves to a good stance
at the 8th bolt; escape left to anchors placed at top of crack; direct
finish to direct anchors has much harder moves and is runout, 5.12+
- 4
-
Vertical Nothing (LH/MT): 5.12b; 8 bolts, anchors; follows a seam
in which sits an old dead stump to the lip, then works diagonally up
and left to the top, passing above the top of the Slab
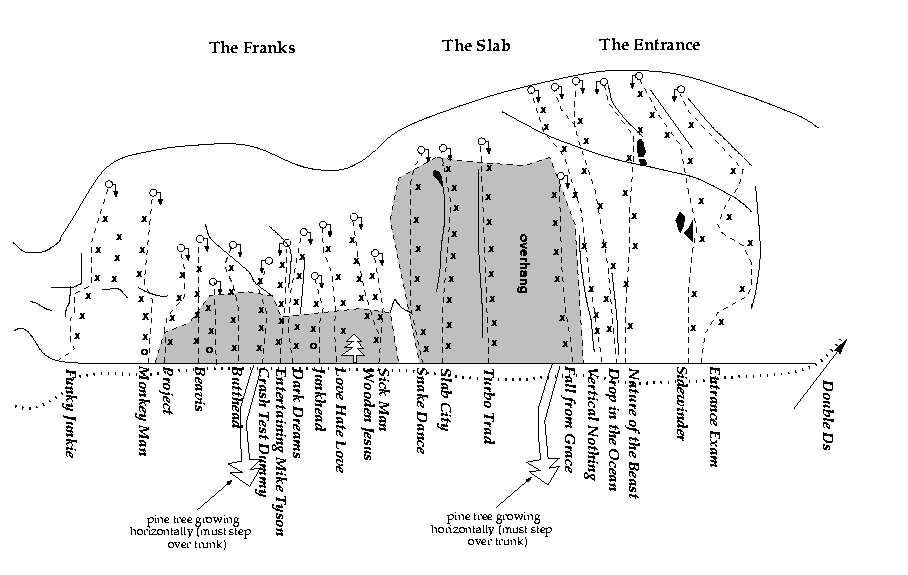
The Slab Wall:
Easily identified, this is a seriously overhanging (at least 120 degrees)
smooth slab; no easy climbs on this part of the wall! Snake Dance
is one of only five routes at that grade in NM; others are in Socorro
(Pimp Daddy (TF), which has a very short crux), Datil (Red
Queen, also with a very short crux, and Child of Light (TF),
although both have been downgraded to 13c/d), Los Alamos (Honkey Serial
Killer at The Dungeon, again very short),
and Sitting Bull Falls (Kootenai Cruiser (CG)). Palomas
has an even harder climb, Sick Man (on The Franks,
for which see below), but it is basically a boulder problem with three
heinous moves, whereas Snake Dance is sustained throughout.
- 4
-
Fall from Grace (TF/LR): 5.13b/c; 6 bolts, anchors, at the front
edge of the \emph{Slab}; excellent moves on the chipped wall
Step over the trunk of a very large horizontally growing pine, then
- 4
-
Turbo Trad (TF): 5.13a; 8 bolts, anchors; the obvious
intermittent hand crack; short crux in the off fingers section
to steep crack climbing; rather painful, so tape up!
- 5
-
Slab City (LH/JT): 5.13b; 9 bolts, anchors; the first seam north of
Turbo Trad
- 4
-
Snake Dance (DP): 5.13d; 7 bolts, anchors; dihedral to seam,
at the northern end of the slab; perhaps 14a now that a crucial hold
broke off
The Franks:
Named for its resemblance to the famed Frankenjura limestone, this area has
a severe bulges for a few feet then continues vertically;
the first few feet overhang by as much as 150 degrees,
so routes are composed of a short, often very hard, boulder problem followed
by a much easier vertical section (which may be absent in the hardest routes,
making them very short).
The last two routes, Monkey Man and Funkie Junkie, are
exceptions: they stand beyond the end of the overhanging section.
- 3
-
Sick Man (TF): 5.14b; 4 bolts, anchors; the crux is just a few
moves to overcome the bulge (V12), involving tiny sharp holds and long
dynamic moves
- -
-
Wooden Jesus (project): 5.14?; 6 bolts, anchors
A large pine tree grows right up against the cliff at this point.
- 2
-
Love Hate Love (TF): 5.12d; 4 bolts, anchors
- 2
-
Junkhead (LN/JT): 5.12a; 3 bolts (1st one chopped), hangers without
chains or other means of rappel at anchors; small pockets
- -
-
new route
- 4
-
Dark Dreams (LH/JT): 5.12b; 5 bolts, anchors; along an
attractive pink streak; low crux to easier climbing above
- 3
-
Entertaining Mike Tyson (bolted by LH, chipped pocket of unknown
origin, FA by DP): 5.13b; 5 bolts, anchors; short climb through overlap
- 1
-
Crash Test Dummy (LH/JT): 5.11d; 4 bolts, anchors; along a black
streak with good side pockets; a mix of jamming and creative positioning;
very painful jams: tape up---or better, avoid it!
Step over the trunk of a horizontally growing pine, then
- -
-
Butthead (project): 4 bolts, anchors of Beavis, loose hold
- 2
-
Beavis (LH/JT): 5.13a; 5 bolts, anchors; bulging thin cracks
- -
-
project (Richard Foust/Eric Robinson): 5.13?; 4 bolts, chain anchors;
starts at the end of the overhang, then moves right on the face and
straight up to the anchors
- 4
-
Monkey Man (LH): 5.12b; 7 bolts (1st bolt chopped), chain anchors;
beyond the severe overhang and taller than most climbs on the Franks;
the first crux is moving past the rounded bulge at the third bolt,
while the true crux is near the top
- -
-
abandoned project; has 3 bolts above a 5ft roof
- 3
-
Funky Junkie (BP/MT): 5.11a/b; 6 bolts, chain anchors; fun and varied,
but not consistent: sidepull, fingerlock (crux), undercling, then huge
ledge and easy face
about 60 meters farther north:
The Showdown Wall:
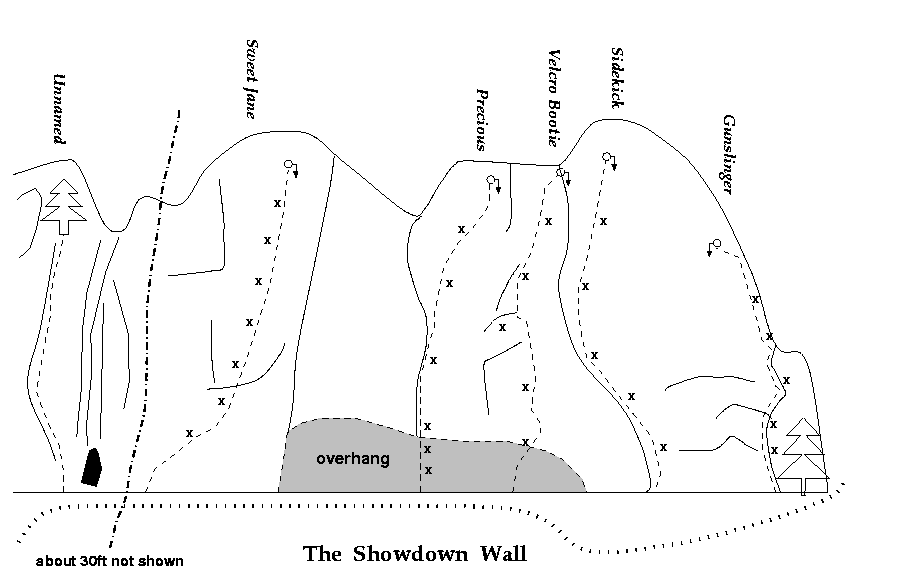
Except for Precious, which is an easy version of routes on The
Franks, these climbs are vertical or less than vertical.
- 5
-
Gunslinger (BP/MT): 5.11d; 5 bolts, anchors; balancy and powerful
lieback on the intermittent crack on right side of buttress shared with
Sidekick; crux is moving from the 1st to the 2nd
bolt (don't hurry to clip it!) -- tendency to barndoor due to poor feet
- 3
-
Sidekick (BP/MT): 5.10c/d; 5 bolts, anchors (1.5 friend optional);
left-trending line on left of buttress; groundfall
potential at 2nd bolt, so use the 1.5 friend before it;
hardest move is the first, to get off the ground;
moving past the 2nd bolt is harder for shorter climbers
- 4
-
Velcro Bootie (David MacInnis/MT): 5.11a; 5 bolts, chain anchors;
look for a raw place in the rock at the lip, followed by a particularly
rough-surfaced slab; the crux is at the bulge at the 3rd bolt
(5.10c if you go way left); the rest is 5.10 with a neat heelhook
at the start; poorly placed 3rd bolt (too far left) mars an
otherwise fun line
- 2
-
Precious (LH/JT): 5.11b/c; 6 bolts, anchors; a few steep 5.11 moves
on the overhang (tape up and drop your knees), then eases to 5.9 crack
climbing; easier for taller climbers; a lot of pain at the start for not
much afterwards
- 1
-
Sweet Jane (EG): 5.12b; 7 bolts, anchors; nothing sweet here;
the bouldery crux is getting to the 1st bolt, placed very high above
a very bad landing; the climb peters out after the 2nd bolt
about 15 meters farther north, a good beginner climb:
- 3
-
unnamed: 5.7; gear, no anchors; a right-facing flake offering excellent pro;
ends at a good tree anchor next to a large boulder (tree has a sling);
just after a pronounced V-shaped crack with a large hole at the base
and just before a downstep in the trail
about 40 meters farther north:
The Transition Zone:
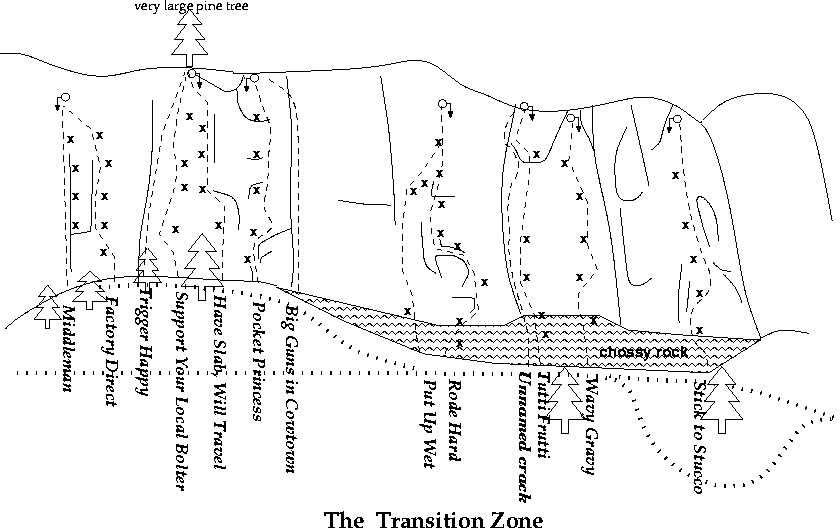
- 5
-
Stick to Stucco (DE/SH/BM): 5.10c/d; 5 bolts, chain anchors;
15 ft to the right of Wavy Gravy,
another (but narrower) grey stucco slab with a bulging start,
passing between two small bushes higher up;
mostly smearing and body positioning, sustained throughout,
with a couple of reachy moves around the 3rd bolt;
one of the best smearing routes here
- 4
-
Wavy Gravy (BP/MT): 5.8; 5 bolts, coldshut anchors; a scooped slab with a grey
stucco look; easier to the right (5.7 crack), but best (though 5.10) to
the left of the bolt line over the smooth dome; a warm-up favourite
- 4
-
Tutti Frutti (DE/BM/MT): 5.11b/c; 5 bolts, rap ring with chain
backup anchor; at the far left side of the Wavy Gravy slab,
move up the choss to a concave face at the bulge; above the bulge,
easy moves to the 5th bolt, then a slight overhang and rounded bulge
to the anchors; crux is moving past the 3rd clip; a great pocket climb!
- 2
-
unnamed crack immediately left of Tutti Frutti: 5.9, gear and
some bolts, plus anchors, of Tutti Frutti
- 5
-
Rode Hard (LH/BP/MT): 5.11c; 8 bolts, coldshut anchors;
bulging front of buttress (several small roofs) and left face;
sustained to the 7th bolt; reachy moves above the 3rd bolt and
a neat move above the 4th, then becomes more technical and less
strenuous; a test of stamina; the best roof climb at Palomas
- 4
-
Put up Wet (LH/BP/MT): 5.11d; 1 low and 2 high bolts plus gear,
using the anchors of Rode Hard; don't pull on big loose
block above 3rd bolt; top is much easier, but run out from 3rd bolt
to anchors, so cross over to last bolt of Rode Hard;
great and varied route (face, crack, lieback, slab) BUT:
protection is minimal (TCUs or nuts in the fingercrack,
then runout to 2nd bolt on hard ground) -- so first toprope it
by climbing Rode Hard.
- 3
-
Big Guns in Cowtown (FA Chris Kessler): 5.9, gear and anchors
of Pocket Princess
- 4
-
Pocket Princess (BM/Mark Ondrias): 5.11a; 5 bolts, chain anchors;
bulge to the right of Have Slab..., with an arching seam and a
diagonal line of pockets; crux is moving past 2nd bolt; nice move
at 5th bolt; with crack on the right, rating drops to 5.9; the best
pocket climb at Palomas; put up in memory of Jane Tennessen
on the second anniversary of her death
- 4
-
Have Slab Will Travel (BP/MT): 5.10b; 5 bolts, chain anchors;
scooped, grey stucco slab just 10 feet above the trail; mostly stemming
with some nice moves; the crux is pulling over the small bulge at the
2nd bolt
- 4
-
Support your Local Bolter (BP/MT): 5.11b; 4 bolts and shares
anchors with Have Slab ...; thin slab; fingery crux is moving
above the bulge from the 2nd to the 3rd bolt;
great kneelock move at the 3rd bolt; pockets and hard-to-believe smear
(but it holds!)
- 2
-
Trigger Happy: 5.9; gear and shares anchors with the previous
two; the obvious crack adjoining ...Local Bolter on the left
- 3
-
Factory Direct (EG): 5.10c; 5 bolts, chain anchors; slab with
black markings on upper half (not lichen, but thin and sharp rock);
mostly big crimpers (avoid open grips if you value your skin!),
with some devious stemming at the bulge; crux is the start
- 4
-
Middleman (DE/BM/Mark Ondrias): 5.11b; 4 bolts and shares anchors
of Factory Direct; the direct line to the anchors; a fun roof
problem, then up along the cleft; you may want to stick-clip the first
bolt
about 20 meters farther north:
The Dihedral Wall:
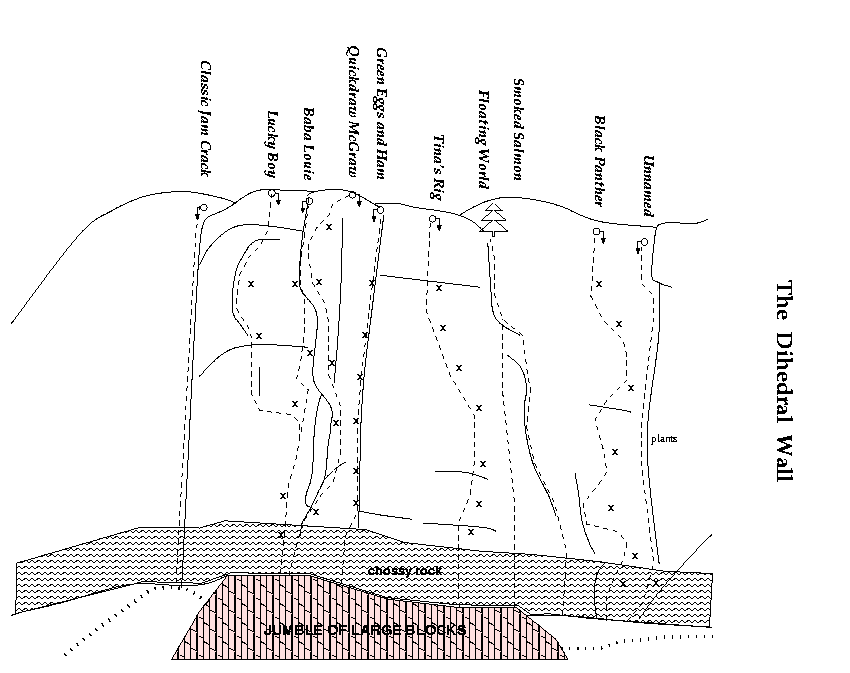
The first 5 climbs are not dihedrals, but the two dihedrals, Green Eggs
and Ham and Baba Louie, are the obvious features of the wall.
- 2
-
unnamed: 5.9+ seam with 1 low bolt, chain anchors; requires gear;
thin and rather dirty seam with much easier upper half
- 4
-
Black Panther (bolted by EG, FA unknown): 5.12c/d; 7 bolts,
chain anchors; near-vertical thin slab; the crux (especially for
shorter climbers) is the left traverse at the 4th bolt, but the whole
climb is sustained, delicate, and devious;
one (crucial, alas) chipped hold by the 6th bolt and excessive height
dependence mar what is otherwise a great route
- 4
-
Smoked Salmon (LR): 5.10a/b; gear; crack arching left to rejoin:
- 3
-
Floating World (LR): 5.11c; gear (had 5 bolts, all chopped);
intermittent seam, straight up; not good for fat fingers -- there will
be no place left for the gear!
- 2
-
Tina's Rig (bolted by TF, FA by LH): 5.12b; 7 bolts, anchors;
three roofs, two at the bottom and one at the top; the crux is at the
2nd roof; the 1st roof requires either a long reach or a strenuous pull
on a drilled one-finger pocket; another drilled pocket near the top
- 5
-
Green Eggs and Ham (LR): 5.10c; 6 bolts, chain anchors;
a strikingly beautiful dihedral, nearly perfect from bottom to top;
can be pure stemming or almost pure face, with any mix in-between;
all clips are on the right
- 5
-
Quickdraw McGraw (BP/MT): 5.11b/c; 5 bolts, chain anchors; the
arête left of Green Eggs ...; wonderful, balancy,
and rather tricky moves; the best arête climb at Palomas;
the last clip is very height-dependent due to poor footholds
- 4
-
Baba Louie (BP/MT): 5.10d; 5 bolts, rap hanger anchors (or pro
and the top 2 bolts: the first three bolts are really to protect Lucky Boy
and are fairly far left of the natural dihedral route); the other
obvious dihedral; less regular
than Green Eggs ... and more difficult; crux is moving
past the small bulge to the left of the large overhang
- 5
-
Lucky Boy (EG/Bill Penner): 5.11c; 5 bolts, chain anchors;
shares first 3 bolts with Baba Louie, but moves on the face,
with no use of the large right-hand crack and block; from the 3rd bolt,
a delicate traverse left, then up to a thin arching lieback crack;
sustained from the traverse to the anchors
- 4
- Classic Jam Crack: 5.9; gear, coldshut anchors; excellent, very regular crack; mostly 5.8 with harder start
about 30 meters farther north:
A so far unexploited section of cliff, with several possible routes in the
5.11-5.12 range.
about 10 meters farther north, after a short rise on the trail:
Randy's Wall:
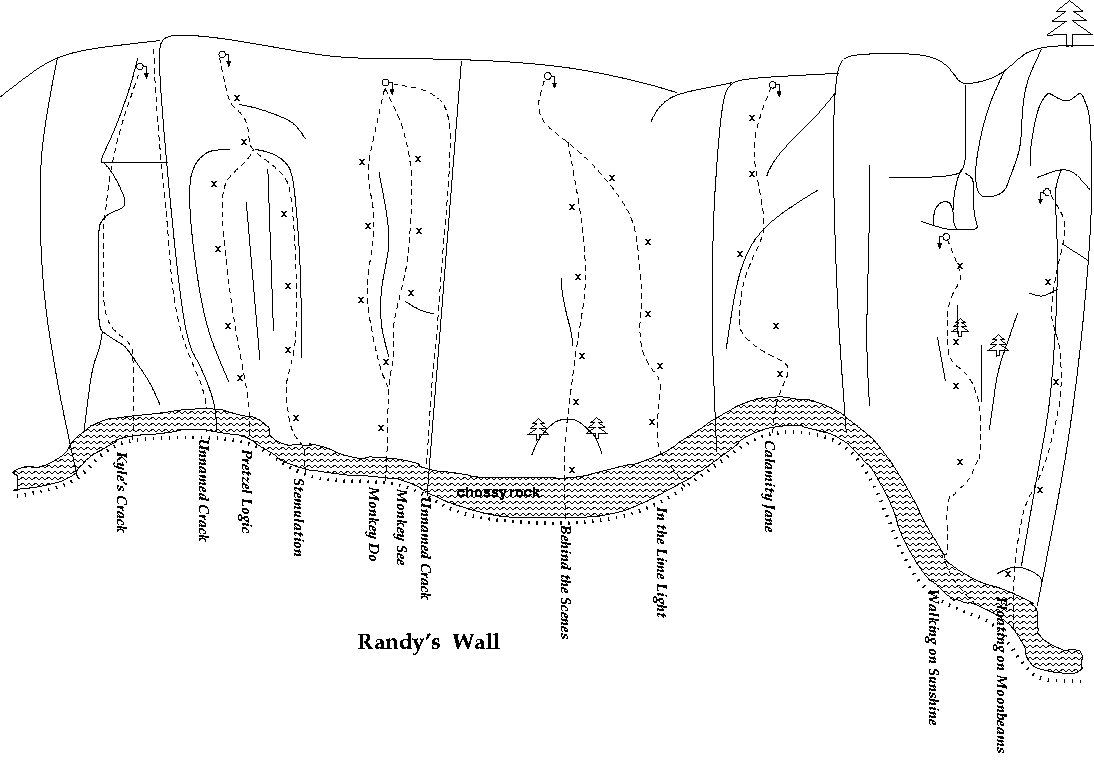
All of these climbs are immediately next to each other.
- 3
-
Floating on Moonbeams (DE/BM/Mark Ondrias): 5.9+; 4 bolts, rap
hanger anchors; the easy dihedral, with a harder start (overcome the
bulge on stem) and a slightly tricky finish;
in memory of T. Sean Elicker
- 4
-
Walking on Sunshine (DE/BM/Mark Ondrias): 5.11b; 4 bolts, chain anchors;
near vertical slab, with cruxes between 2nd and 3rd and between 4th
and anchors (sunshine is about all you get for feet...); short, but
one of the best smearing climbs here;
in memory of T. Sean Elicker
- 4
-
Calamity Jane (SH/BM): 5.11b/c/d; 5 bolts, chain anchors;
vertical slab to 4th bolt, then easier top; all clips are on the left;
crux is traversing left at 2nd bolt to undercling and moving up from it;
rating (11b if you are at least 5'8", 11d if you are less than 5'5")
assumes no use of left-hand crack;
in memory of Jane Tennessen
- 5
-
In the Limelight (RE): 5.11d; 5 bolts, coldshut anchors; left-trending
slab ramp; a beautiful line; easy to 2nd bolt, then very thin and
sustained to 5th bolt; cruxes are reaching the 3rd bolt (slippery
lieback) and then the 4th bolt (balancy no-hand mantel); one of the
best smearing climbs here
- 5
-
Behind the Scenes (Paul Davidson/Eric Rhichard): 5.11d;
5 bolts and shares anchors of Limelight;
straight to the anchors, up on some choss,
then over a rounded blank slab; easy to the 3rd bolt,
then the crux requires a mantel off a small crimp low on the left
and a poor pinch up on the right, with only smearing for feet;
after mantel, returns to easy 11 moves; stays in the shade all day
- 3
-
unnamed thin crack, just right of Monkey See (FA Karl Kiser):
5.9-; gear, move left to anchors of Monkey See
- 4
-
Monkey See (RE): 5.11d; 5 bolts, chain anchors; a series of
strenuous laybacks on rounded edges and some good cracks
- 1
-
Monkey Do (RE): 5.12a; 5 bolts and shares anchors of Monkey
See, as well as first 2 bolts; marginally harder, but not nearly as good
- 4
-
Stemulation (BP/MT): 5.11b/c/d; 6 bolts, rap hanger anchors;
small overhang, easy stemming, then lieback using big edges on the right
before returning to stem---getting back on stem is the crux; traverse
left above the 4th bolt to rejoin the 5th bolt of Pretzel Logic;
then easy moves to the top; get to the anchors by moving left and up;
very reachy and thus quite height-dependent
- 5
-
Pretzel Logic (BP/MT): 5.11b/c (slightly harder for tall people);
6 bolts; shares last 2 bolts and anchors with Stemulation;
the best stemming climb at Palomas; the crux is moving past the 3rd
bolt (stay on stem!) and clipping the 4th; then stay on stem until
your feet are almost level with the 4th bolt; somewhat painful start
- 3
-
unnamed thin crack, just right of Kyle's Crack (FA John Kear):
5.9; gear, no anchors
- 4
-
Kyle's Crack: 5.7; gear, chain anchors; easy crack with very solid
(largish) pro
- 1
-
unnamed: 5.9; 3 bolts + gear (behind hollow flake), no anchors;
slabby left-trending ramp
about 25 meters farther north:
- 3
-
Fat Lips, Thin Smile (SH/BM): 5.12c; 4 bolts, rap hanger
anchors; short, slightly overhanging north face with three successive
bulges offering only thin underclings and poor crimpers; sustained
12- climbing from the 1st to the 4th bolt, with easy top; getting
to the first bolt without using the left-hand ramp is extremely hard
with less than a 6ft reach
about 25 meters farther north:
The Far Side I:
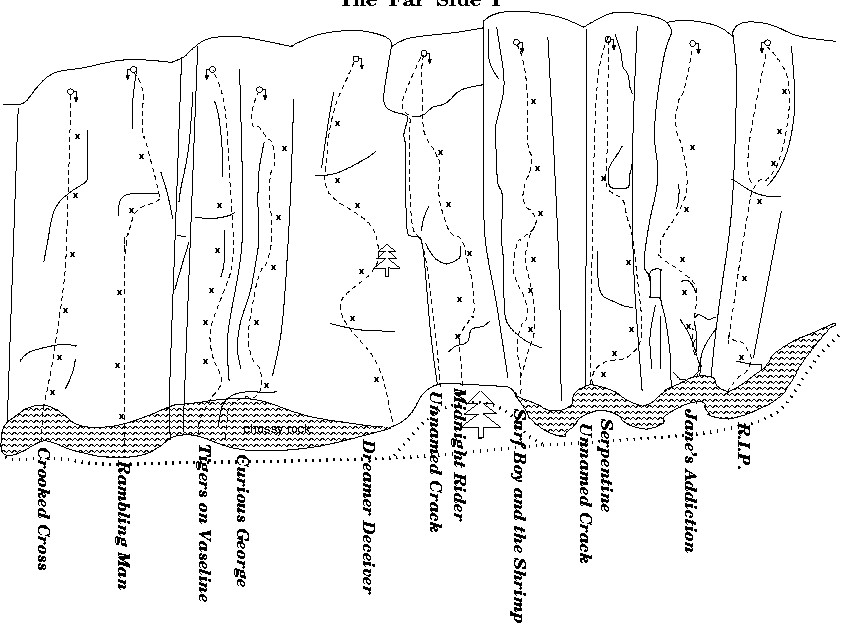
Locate the first climb, R.I.P., after the trail has descended again
to allow sufficient height, on a west-facing slab next to a deep crack.
- 4
-
R.I.P. (RE): 5.12b; 6 bolts, chain anchors; tenuous slab on bottom
half and arête on top half; the crux is the setup on the arête
(a number of positive edges broke, making the arête harder than
the original 5.12a)
- 4
-
variant: 5.11d (must be top-roped for now); go straight up on the second
half, on another thin (though easier) slab; left crack is off;
needs one bolt in the middle of the top face to make it easier to lead,
using the first 5 bolts and anchors of R.I.P.
- 5
-
Jane's Addiction (SH/BM): 5.12a; 5 bolts, rap hanger
anchors; across from R.I.P., a south face with overhanging start
to a thin and balancy slab top; great move at the lip where you must quickly shift
your hand from a sidepull to an undercling and move to a mantel;
rating assumes no use of adjoining cracks and faces;
in memory of Jane Tennessen, addicted to pretty rock faces
- 4
-
Serpentine (BM/Krister Swenson): 5.11b; 5 bolts, cold shut anchors
(anchors put up by MT/BP); up the dihedral past the choss, then a delicate
traverse right to the arete, easy arete to the 4th bolt,
a second crux on the now rather blank arete to reach a series of good holds
underneath the small ``nose", then back to the face for an easy finish.
- -
-
unnamed crack (FA John Kear): 5.9; gear, anchors of Serpentine;
the dihedral crack between R.I.P. and Midnight Rider
- 4
-
Surfer Boy and the Shrimp (DE/BM): 5.11d; 6 bolts, cold shut
anchors, on the face to the right of Midnight Rider;
a face climb, but the left arete (the edge of the big crack)
is used for hands; much easier (5.10) after the 4th bolt,
but requires creative positioning and
good crimping strength (not to mention a strong left arm)
to power through the first 4 bolts;
put up in memory of Jane Tennessen on the third anniversary of
her death..
Note: can be climbed without using the left arete at all,
at about 5.12b.
-
- 5
-
Midnight Rider (EG/MT): 5.11c; 5 bolts, chain anchors; a thin slab
face between two cracks; technical and balancy, with no real rest,
all on crimpers; crux is reaching the 3rd bolt on a left-leg mantel
from a small right-hand crimper; the best edging climb at Palomas
- 3
-
the crack to the left of Midnight Rider: 5.10-, (large) gear and
uses the anchors of Midnight Rider
- 4
-
Dreamer Deceiver (CG/PM): 5.12d/13a/b; 6 bolts, chain anchors;
the face to the left of Midnight Rider; overhung start;
mostly blank slab with small seam and bulge at the top;
very reachy sideways moves, many at full arm stretch; sustained and pumpy
- 4
-
Curious George (EG/MT): 5.10d; 5 bolts, chain anchors; powerful
right-facing lieback on big holds with one rest; crux is the start
(preclip the 1st bolt, downclimb, then start on the left,
to use the poor undercling); toprope not advisable because the rope gets
pinched in the crack towards the top
- 3
-
Tigers on Vaseline(SH/BM): 5.13+; 5 bolts, chain anchors
(easy 5.11 run out between the last bolt and the anchors);
the west face immediately left of Curious George;
very thin, reachy, and powerful; the crux is bridging the gap
from the last good undercling to the seam on the upper face;
very height-dependent -- probably impossible with less than a 6ft reach
- 4
-
Rambling Man (BP/MT): 5.10c/d; 5 bolts, chain anchors; lower part
is mostly stem, with some huge sidepulls; roof has reachy or tricky (if
you are less than 5'5") moves; upper part is interesting slab climbing
(huge death block is gone!)
- 3
-
Crooked Cross (CG): 5.12b/c; 6 bolts, chain anchors; another
west-facing slab, with a crack running through the top half;
the powerful and technical crux is from the 2nd to the 3rd bolt;
the rest is 5.11
Some 10 meters farther north:
- -
-
unnamed: 5.10a; behind young trees, a west face with two crack systems
separated by 6 feet and protected at the end of the first crack by a pin
and between the two by a bolt; gear in the cracks
- 1
-
unnamed: 5.10b; a short southeast-facing slab with 3 bolts to a BFT;
hard start, then easy moves
The path then descends sharply, with a bottleneck between the rock face
and a large tree. About 10 meters farther north, you reach the area of
choice for intermediate climbers, with several excellent, long, moderate
9s and 10s. Easily recognizable by the 15ft high band of very chossy rock
at the bottom of the climbs. Be careful in that zone: small pieces break
easily and regularly, especially after a rain.
The Far Side II:
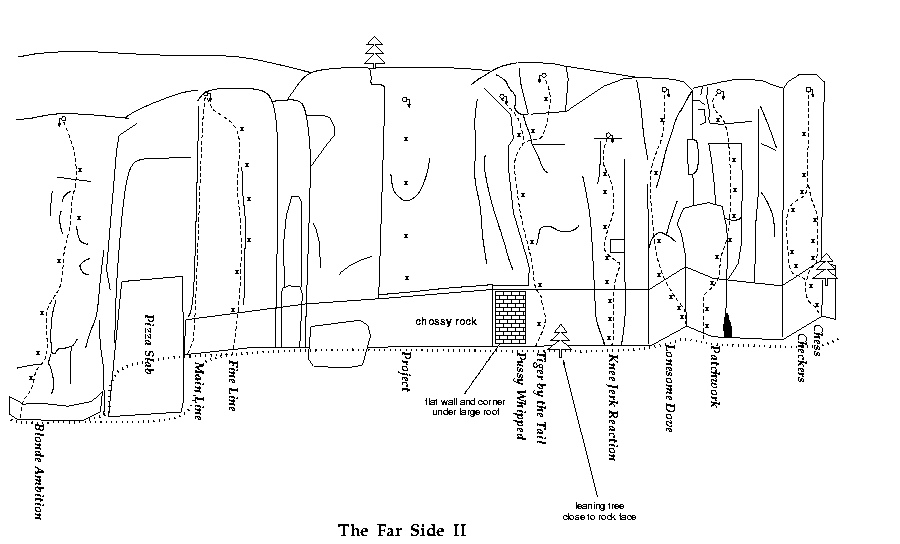
- 3
-
Chess (RE): 5.10b/c; 7 bolts, fixed nut, triple anchors (chains and
rappel ring); less varied than its twin below;
the crux is a reachy delicate move to fixed nut after 5th bolt,
much harder for shorter climbers
- 5
-
Checkers (RE): 5.10b; 7 bolts, fixed nut, triple anchors, sharing
the first 2 bolts, the nut, the last 2 bolts, and the anchors with
Chess; the crux is pulling over the lip at the 3rd bolt;
enjoyable traverse move from the 5th bolt to the fixed nut
- 5
-
Patchwork (RE): 5.10b; 9 bolts, triple anchors (chains and rappel
ring); a fun and varied face climb; 9th bolt sometimes has a quicklock,
but go to the top and enjoy these last moves (you can use the left-hand
crack to reach the anchors, but the pendulum fall would be bad;
so move straight up; the hard part of these last moves is pulling
until your right foot rests on the bottom corner next to the bolt and
so is well protected); crux is reaching 2nd bolt on the choss
- 5
-
Lonesome Dove (BP/MT): 5.9+; 7 bolts, chain anchors;
the grade is sustained, with good exposure (and an easy runout) on
the arête; a popular warm-up
- 4
-
Knee Jerk Reaction (BP/MT): 5.11c; 8 bolts, chain anchors; about
10 meters north of the Dove, goes through a bulge around a large
jutting block; 1st bolt is very low (at nose level);
a pump fest with a technical crux between the 4th and 5th bolt,
just below the jutting block; much easier (5.10) from the 6th bolt on;
similar in many ways to Rode Hard
- 5
-
Tiger by the Tail (BP/MT): 5.9+; 6 bolts, chain anchors;
this climb is about 20 meters north of the Dove, by a large roof;
it ascends the easy dihedral, then moves right to the short upper face;
easier than it looks
- 3
-
Pussy Whipped (BP/MT): 5.8+; 5 bolts, chain anchors, sharing the
first 4 bolts of Tiger ... and moving left from there to a lower
set of anchors; a popular warm-up
- -
-
project (CG/PM): 5.12?; high bolts, chain anchors; crack through roof just
north of Tiger ...; unfinished due to problems with protection
on choss at bottom
- 4
-
Fine Line (LH/BP/MT): 5.12a; 6 bolts (or gear), anchors; seam right
of Pizza Slab, shares anchors of Main Line; hard moves (rounded
lieback) above 2nd bolt; angles left at top to rejoin Main Line
- 4
-
Main Line (BP/MT): 5.9; gear/anchors; crack/dihedral by the
Pizza Slab
Pizza Slab (large leaning slab), then:
- 5
-
Blonde Ambition (DE/BM): 5.11c; 6 bolts, rap ring anchor
with chain backup; thin intermittent crack and seam on otherwise blank vertical
face immediately north of the Pizza Slab; few footholds from 1st
to 6th bolt; crux is moving past 2nd bolt on lieback with poor feet;
assumes no use of right-hand crack at the first 3 bolts, otherwise rating
drops to 11a;
put up in memory of Jane Tennessen on the first anniversary of her
death
about 10 meters north:
Red Light District:
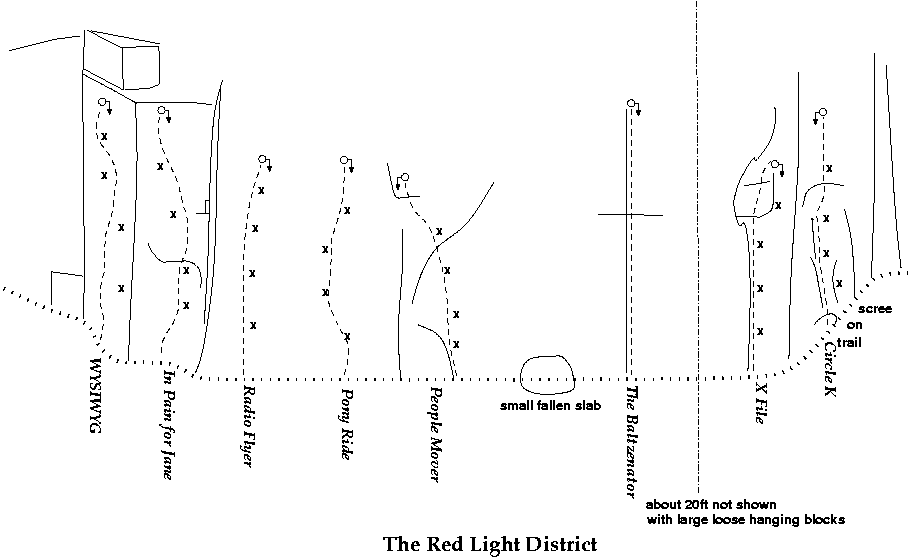
- 3
-
Circle K (EG): 5.10d; 4 bolts, chain anchors;
find this climb about
30 meters north of the Pizza Slab, on a sharp downturn of the trail;
a short, right-facing lieback crack ends at the 3rd bolt, leading to a
delicate crux at the 4th bolt; preclip the 1st bolt, out of reach on
the natural line
- 3
-
X File (EG): 5.10b; 4 bolts, chain anchors; next to
Circle K, a short, left-facing, lieback crack on huge edges;
all clips are right-hand clips; the last clip and the anchors are to
the right of the line; can easily be led on gear at the same grade
- 2
-
The Baltzenator (MT/Dave Baltz): 5.11b; gear, chain anchors; the
obvious crack up the wall and through a large roof; easy and solid gear
to the roof, but requires very long reach at the roof to place good
(large) pro above the lip
small leaning slab, then:
- 3
-
People Mover (EG): 5.6; 4 bolts, chain anchors; an easy first lead,
short, with a 5.4 runout to the anchors
- 2
-
Pony Ride (EG): 5.10a; 4 bolts, chain anchors; somewhat contrived,
with cruxes at the start and at the 4th bolt
- 3
-
Radio Flyer (EG, 1st ascent by DP): 5.13a; 4 bolts,
chain anchors; a very thin slab, rounding off gently; smears,
ill-defined ripples, and tenuous underclings
- 4
-
In Pain for Jane (SH/BM): 5.12b/d; 4 bolts, coldshut anchors;
immediately before the corner, a thin face with a bulge and much easier
top; very balancy and technical, on small painful holds and toe-tips;
top; just 8 hard ft of climbing, but very balancy and very sequential,
on tiny painful holds and toe-tips; for climbers less than 5'7",
the grade goes up quite a bit, since there are no intermediate hand
(or foot) holds; in memory of Jane Tennessen
- 4
-
WYSIWYG (SH/BM/MT): 5.10d; 4 bolts, coldshut anchors;
around the corner, facing northwest, a face with a dark waterstain;
gently overhanging and thus quite strenuous, especially at the start
The cliff band more or less vanishes at this point. By walking 10 meters
along the band and switching back, one can reach the top of WYSIWYG.
Views to the northwest are magnificent.
THE TICK LIST:
(Note: does not include projects, since their rating is uncertain.)
- 5.6
-
Red Light District:
People Mover: 4 bolts, chain anchors
- 5.7
-
Showdown Wall:
unnamed crack: gear/BFT, left flake
-
Randy's Wall:
Kyle's Crack: gear/chain anchors
- 5.8
-
Transition Zone:
Wavy Gravy: 5 bolts, chain anchors
-
Far Side:
Pussy Whipped: 5 bolts, chain anchors
- 5.9
-
Transition Zone:
unnamed crack, immediately left of Tutti Frutti: gear and shares anchors with Tutti Frutti
Trigger Happy: gear and shares anchors with Have Slab...
-
Dihedral Wall:
Classic Jam Crack: natural gear crack, anchors
unnamed: 3 bolts + gear, no anchors; slabby left-trending ramp
-
Randy's Wall:
Floating on Moonbeams: 4 bolts, rap hanger anchors
-
Far Side:
Lonesome Dove: 7 bolts, chain anchors
Tiger by the Tail: 6 bolts, chain anchors
Main Line: gear/chain anchors
- 5.10a
-
Far Side:
unnamed: behind young trees, a west face with two crack systems, bolt & pin
-
Red Light District:
Pony Ride: 4 bolts, chain anchors; somewhat contrived
- 5.10b
-
Transition Zone:
Have Slab Will Travel: 5 bolts, chain anchors
-
Far Side:
unnamed; a short southeast-facing slab with 3 bolts to a BFT
Chess: 7 bolts, fixed nut, triple anchors
Checkers: 7 bolts, fixed nut, triple anchors
Patchwork: 9 bolts, triple anchors
-
Red Light District:
X File: 4 bolts, chain anchors
- 5.10c
-
Entrance Area:
Entrance Exam: 6 bolts, rap hanger anchors
-
Showdown Wall:
Sidekick: 5 bolts, anchors (1.5 friend optional)
-
Transition Zone:
Stick to Stucco: 5 bolts, chain anchors; narrow grey stucco slab
Factory Direct: 5 bolts, chain anchors; slab with black markings
-
Dihedral Wall:
unnamed: seam with 1 bolts, anchors; requires gear; dirty
Smoked Salmon: gear; good crack
Green Eggs and Ham: 6 bolts, chain anchors
-
Far Side:
unnamed: gear, anchors: the crack to the left of Midnight Rider
Rambling Man: 5 bolts, chain anchors
- 5.10d
-
Dihedral Wall:
Baba Louie: 5 bolts, rap hanger anchors
-
Far Side:
Curious George: 5 bolts, chain anchors
-
Red Light District:
Circle K: 4 bolts, chain anchors
WYSIWYG: 4 bolts, coldshut anchors
- 5.11a
-
Showdown Wall:
Velcro Bootie: 5 bolts, chain anchors
-
Transition Zone:
Put up Wet: 3 bolts & 2 TCUs, with anchors of Rode Hard
Pocket Princess: 5 bolts, chain anchors
- 5.11b
-
The Franks:
Funky Junkie: 6 bolts, chain anchors
-
Showdown Wall:
Precious: 6 bolts, anchors
-
Transition Zone:
Tutti Frutti: 5 bolts, rap ring anchors
Support your Local Bolter: 4 bolts, anchors
Middleman: 4 bolts, anchors
-
Dihedral Wall:
Quickdraw McGraw: 5 bolts, chain anchors
-
Randy's Wall:
Walking on Sunshine: 4 bolts, chain anchors
Calamity Jane: 5 bolts, chain anchors
Stemulation: 5 bolts, chain anchors
Pretzel Logic: 6 bolts, chain anchors
-
Far Side:
Serpentine: 5 bolts, cold shut anchors
-
Red Light District:
The Baltzenator: gear, chain anchors
- 5.11c
-
Transition Zone:
Rode Hard: 8 bolts, chain anchors
-
Dihedral Wall:
Floating World: gear; rejoins Smoked Salmon
Lucky Boy: 5 bolts, chain anchors
-
Far Side:
Midnight Rider: 5 bolts, chain anchors
Knee Jerk Reaction: 7 bolts, chain anchors
Blonde Ambition: 6 bolts, anchors
- 5.11d
-
Entrance Area:
Double Ds: 4 bolts, anchors
Drop in the Ocean: 8 bolts, anchors
-
The Franks:
Crash Test Dummy: 3 bolts, anchors
-
Showdown Wall:
Gunslinger: 5 bolts, anchors
-
Randy's Wall:
In the Limelight: 5 bolts, chain anchors
Behind the Scenes: 5 bolts, chain anchors
Monkey See: 5 bolts, chain anchors
-
Far Side:
Surf Boy and the Shrimp: 6 bolts, coldshut anchors
- 5.12a
-
Entrance Area:
Nature of the Beast: 8 bolts, anchors
-
The Franks:
Junkhead: 4 bolts, anchors
-
Randy's Wall:
Monkey Do: 5 bolts, chain anchors
-
Far Side:
R.I.P.: 6 bolts, chain anchors
Jane's Addiction: 5 bolts, rap hanger anchors
Fine Line: gear or 6 bolts, chain anchors
- 5.12b
-
Entrance Area:
Sidewinder: 9 bolts, chain anchors
Vertical Nothing: 8 bolts, anchors
-
The Franks:
Dark Dreams: 6 bolts, anchors
Monkey Man: 6 bolts, chain anchors;
-
Showdown Wall:
Sweet Jane: 7 bolts, anchors
-
Dihedral Wall:
Tina's Rig: 7 bolts, chain anchors
-
Far Side:
Crooked Cross: 6 bolts, chain anchors
-
Red Light District:
In Pain for Jane: 4 bolts, coldshut anchors
- 5.12c
-
The Franks:
Love Hate Love: 4 bolts, chain anchors
-
Dihedral Wall:
Black Panther: 7 bolts, chain anchors
-
Randy's Wall:
Fat Lips, Thin Smile: 4 bolts, rap hanger anchors
- 5.12d
-
Far Side:
Dreamer Deceiver: 6 bolts, chain anchors
- 5.13a
-
Slab Wall:
Turbo Trad: 8 bolts, anchors
-
The Franks:
Beavis: 5 bolts, anchors
-
Red Light District:
Radio Flyer: 4 bolts, chain anchors
- 5.13b
-
Slab Wall:
Fall from Grace: 6 bolts, anchors
Slab City: 9 bolts, anchors
-
The Franks:
Entertaining Mike Tyson: 4 bolts, anchors
- 5.13c
-
Far Side:
Tigers on Vaseline: 5 bolts, chain anchors
- 5.13d
-
Slab Wall:
Snake Dance: 7 bolts, anchors
- 5.14b
-
The Franks:
Sick Man: 4 bolts, quicklock anchors
Wooden Jesus: 6 bolts, chain anchors