Figure 1.1: A sample SPARC program implementing z = 2x +y
To describe the translation of assembly language programs and introduce basic features of ISEM, the instructional SPARC emulator.
After completing this lab, you will be able to:
In this lab we describe the translation process and introduce the basic features of ISEM. We begin by describing the translation process: the steps used to translate an assembly language program into an executable program. After describing the translation process, we describe how you can execute and test executable programs using ISEM.
The first thing you need is a simple SPARC program. Figure 1.1 illustrates a simple SPARC program. We will use this program in the remainder of this lab.

Figure 1.1: A sample SPARC program implementing z = 2x +y
Once you have a SPARC program, you will need to assemble and link your program before you can run it using ISEM. The assembler translates assembly language programs into object program. The linker transforms object programs into executable programs that you can execute using ISEM
To assemble a SPARC program, you need to specify the file that holds the assembly language program and the file that will hold the resulting object program. Assembly commands start with the name of the assembler, isem-as, followed by (optional) listing specifications, followed by an output file specification, followed by the name of the source file. We will use the listing specification ``-als'' (to generate a source listing and a list of symbols). The output specification consists of a -o followed by the name of the output file. Figure 1.2 illustrates the interaction that results when you assemble the program in foo.s.

Figure 1.2: Illustrating the isem-as command.
The linker is called isem-ld. Linker commands start with the name of the linker, isem-ld, followed by an output specification, followed by the name of the file containing the object program.
In the preceding paragraphs, we used the files foo.s (for the assembly language program), foo.o (for the object program), and foo (for the executable program).
Once you have assembled and linked your assembly language program, you can execute your program using ISEM. To start ISEM, you need to issue the ISEM command, ``isem''.
When you start ISEM, you will see an introductory message followed by the ISEM prompt (``ISEM>''). When you see this prompt, you can issue an ISEM command. Figure 1.3 illustrates the interaction you should expect to see when you start up ISEM.

Figure 1.3: Illustrating the isem command.
The load command is used to load executable programs into the ISEM environment. The load command consists of the name of the command (load) followed by the name of a file containing an executable program.
Figure 1.4 illustrates the ISEM load command. In examining this interaction, note that ISEM tells you where it loaded the program text (instructions) and data (variables). ISEM also tells you the current value of the program counter (PC) and the next program counter (nPC). Finally, ISEM shows you the next instruction that it will execute (i.e., the instruction pointed to by the PC).

Figure 1.4: Illustrating the load command.
Note that the instruction (sethi 0x8, %g2) doesn't look like the first instruction in the sample program (set x, %r2). We will discuss the reason for this when we consider synthetic operations in Lab 9. For now, it is sufficient to know that set instruction may be implemented using two instructions: a sethi instruction followed by an or instruction.
You can execute your program, one instruction at a time, using the trace command. The trace command executes a single instruction and reports the values stored in the registers, followed by the next instruction to be executed.
Figure 1.5 illustrates three successive executions of the trace command. Note that register 2 (first row, third column) now has the value 0x00000042--the value used in the initialization of x.

Figure 1.5: Illustrating the trace command.
To complete the execution of the sample program, you need to issue nine more trace commands (a total of twelve trace commands). As you issue trace commands, note how the values in registers 2 and 3 change. When you have executed all of the instructions in the sample program, ISEM will print the message ``Program exited normally.'' Figure 1.6 illustrates the execution of the last two trace commands.

Figure 1.6: Completing execution of the sample program.
The trace command is useful because it lets you see how each instruction affects the registers when it is executed. You can also examine the contents of memory using the dump command. You can issue a dump command any time you see the ISEM> prompt.
To use the dump command, you need to specify the range of memory values that you want to examine. A range of memory locations is specified using two memory addresses separated by a comma. Memory addresses can be specified using an integer value or the name of a label. For example, to see the final value stored in the memory location associated with the label ``z'' you could use the range ``z, z''.
Figure 1.7 illustrates the dump command. The dump command reports memory values in pairs of hexadecimal digits. Each word of memory is 32 bits and, as such, requires four pairs of hexadecimal digits. In examining Figure 1.7, note that ``z'' holds the value 0xa4 (the final value in register %r2).
![]()
Figure 1.7: Illustrating the dump command.
Because memory addresses can be specified using the labels defined in an executable program, you may be interested in knowing which labels have defined values. After you have loaded an executable program, you can use the symb command to display the values defined by the program. Figure 1.8 illustrates the symb command.

Figure 1.8: Illustrating the symb command.
The edit command sets the values stored in memory locations. Each edit command requires two arguments, the memory location to edit and the value to store in the memory location. For example, you could use the command ``edit x 0x20'' to set the value of the memory location labeled ``x'' to the value 0x20.
You can use the reg command to set the values in the registers. The reg command can have zero, one or two arguments. The first argument (if present) must be the name of a SPARC register. The second argument (if present) must be a value. With zero arguments the reg command prints the contents of all of the SPARC registers. With one argument the reg command prints the value of the specified register. With three arguments the reg command sets the register specified by the first argument to the value specified by the second argument.
Table 1.1 summarizes the names of the SPARC registers. For now, you only need to be familiar with the integer registers and the program counters. We will consider the remaining registers in later labs.
For example, the command ``reg %pc start'' resets the PC to the start of the program. You can use this command when you want to rerun the sample program.
You can use the run command to execute your program, starting with the instruction pointed to by the PC. This command does not take any arguments and executes instructions until it encounters a breakpoint, an illegal instruction, or a program termination instruction (ta 0).
Figure 1.9 illustrates the run command. This interaction starts by setting the %pc and then issuing the run command. Note that the run command produces an error message. In this case, the run command stopped executing program instructions because it encountered an illegal instruction. Whenever you load a program, ISEM makes sure that there is an illegal instruction following the last instruction in your program.

Figure 1.9: Illustrating the reg and run commands.
You can use the break command to set breakpoints (the run command terminates when it encounters a breakpoint). To set a breakpoint, you can issue a break command with a single argument, the address of the breakpoint. After you have set a breakpoint, the run command will stop executing your program just after it executes the instruction at the specified address.
Figure 1.10 illustrates the use of the break command. In this case, the breakpoint stops the program 20 bytes after the start label--just before the ``add %r2, %r2, %r2'' instruction. Note that ISEM reports the breakpoint address in hexadecimal.

Figure 1.10: Illustrating the break command.
The help command may be the most important command provided by ISEM. The help command takes a single, optional argument. When it is supplied, the argument is the name of the item that you would like more information about. Without any arguments, the help command tells you the items that help knows about.
When you are done interacting with ISEM, you can issue the quit command.
The ISEM/SPARC architecture provides two separate regions of memory: one for text (code) and another for data. This means that there are two memory locations with the address 100, one in the program memory and another in the data memory. ISEM is reasonably intelligent about when it uses each of these memories. ISEM always fetches instructions from the program memory and the load and store operations always refer to the data memory. In addition, the load command always loads programs into the program memory and the dump and edit commands use the data memory by default.
In this lab we have described the steps in the translation process and introduced that basic functions provided by ISEM.
The ISEM assembler, isem-as, translates an assembly language program into object code. The linker, isem-ld, translates an object code program into an executable program. Figure 1.11 summarizes the steps uses to translate an assembly language program into an executable program.

Figure 1.11: Translation steps
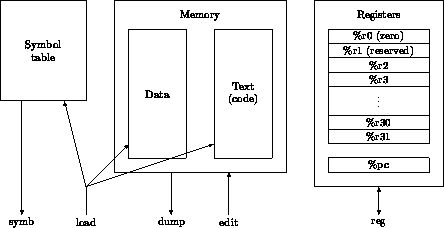
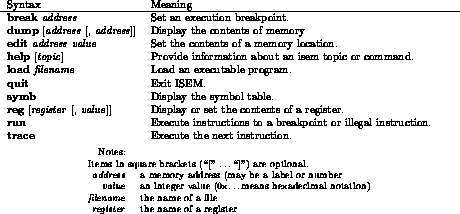
When you have an executable program, you can use ISEM to execute and test your program. Figure 1.12 illustrates the basic components of ISEM and shows the commands that manipulate these components. Table 1.2 summarizes the ISEM commands that we have discussed in this lab.

Figure 1.12: The components of ISEM

Table 1.2: The commands of ISEM