To cover uses of the graphics accelerator device provided by ISEM. (Currently, this device is only available in the X11 environment.)
After completing this lab, you will be able to write assembly language programs that use:
In the previous labs, we have focused on assembly language programming, presenting SPARC instructions and assembler directives. Now, it's time for some fun! In this lab we present the ISEM graphics accelerator device, gx. In addition to showing you how a simple device works, this lab will give you an opportunity to review the assembly language constructs covered in the previous labs.
When you open the gx device, it creates a black and white graphics
window. By issuing gx commands, you can instruct the gx device to
draw lines, fill rectangles, and copy rectangles in the window. The
visible gx display is ![]() pixels. Individual pixels in the
visible region are addressed by an (x,y) pair. The pixel in the
upper left corner of the display is addressed by the pair (0,0).
The pixel in the lower right corner is addressed by the pair
(511,511).
pixels. Individual pixels in the
visible region are addressed by an (x,y) pair. The pixel in the
upper left corner of the display is addressed by the pair (0,0).
The pixel in the lower right corner is addressed by the pair
(511,511).
In addition to the visible pixels, the gx device provides a 512x64 rectangle of pixels that are not displayed. These pixels are commonly used with the blt operation (described later in this lab). They are addressed using the pixel addresses (0,512) through (511,575). Figure 8.1 illustrates the pixel addresses provided by the gx device.
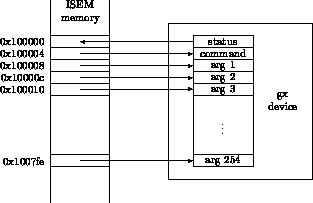
The gx device is a ``memory mapped'' device. This means that the gx device registers are mapped into memory locations and can be accessed using the standard load and store operations. (The SPARC architecture doesn't provide any special I/O instructions, so all devices must be memory mapped when they are used with a SPARC.) The gx device has 256 registers: a status register, a command register, and 254 argument registers. Each register is one word (four bytes, 32 bits) wide.
The status register is mapped into memory location 0x100000. Storing a value into this location has no affect; however, when you load a register using this memory location, you will actually read the status register of the gx device. The value of the status register is 0 when the gx device hasn't been (opened and) displayed. This register has the value 1 when the device has been opened and mapped onto the display. The gx command register is mapped to memory location 0x100004 while the argument registers are mapped to memory locations 0x100008-0x1007fe. Figure 8.2 illustrates the mapping of gx registers into the ISEM memory.

Figure 8.2: The gx register/memory map
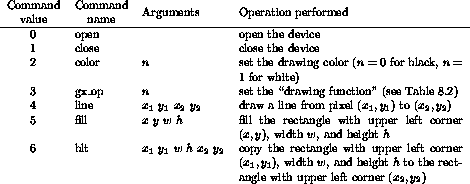
The gx device provides commands to draw lines, fill rectangles, and copy rectangles on the display. Table 8.1 summarizes the commands provided by the gx device.

Table 8.1: Commands provided by the graphics accelerator
Before you issue any other gx commands, you must first open the device. When you issue the open command, the gx device creates an X11 window and initializes the display memory. The display is initially is solid white, and the drawing color is black.
After you are done using the gx device, you can explicitly close the device using the close command. If you don't issue a close command, the display window will be destroyed when you exit isem, as such, closing the gx device is not critical.
You can use the color command to set the color used to draw lines and fill rectangles. This command takes a single argument, the color. If the argument is 0, the gx device draws lines an fills rectangles in black; otherwise, if the argument is 1, the gx device draws lines and fills rectangles in white.
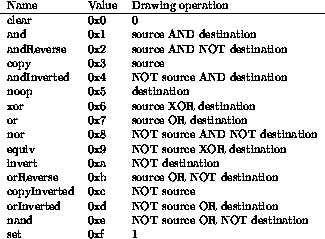
The gx_op command has a single argument. This command sets the drawing function to the value of the argument. When the gx device is initialized, the drawing function is ``copy''. That is, the gx device simply copies the drawing color (when drawing a line or filling a rectangle) or the source pixel (when copying a rectangle) to the destination pixel. Table 8.2 summarizes the other drawing functions provided by the gx device.

Table 8.2: Drawing operation supported by the graphics accelerator
The line function draws a line from one pixel to another based on the current drawing color and function. This command takes four arguments: two arguments to specify the coordinates for each pixel.
The fill command fills a rectangle based on the current drawing color and function. This command takes four arguments: the first two arguments specify the coordinates of the upper left corner of the rectangle, the third argument specifies the width of the rectangle, and the fourth argument specifies the height of the rectangle.
The blt command copies (subject to the drawing function) a rectangle from one part of the gx memory to another. This command takes six arguments: the first four arguments specify the source rectangle, the last two specify the upper left corner of the destination rectangle.
To issue a gx command, you first store the arguments in the gx argument registers and then store the command into the gx command register. The order in which you perform these stores is critical. You must load the command register after you have loaded the argument registers. The gx device reads its argument registers as soon as you store a value in the command register.
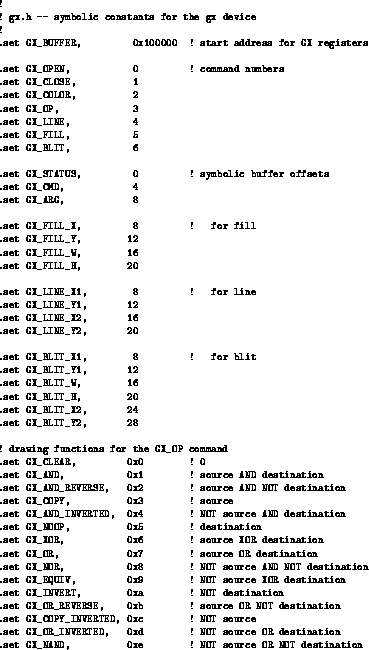
Symbolic constant that make devices, like the gx device, easier to use are commonly defined in header files. Figure 8.3 presents a header file for the gx device. Example 8.1 illustrates the gx device and a use of the gx header file.

Figure 8.3: The gx header file. gx.h
        .include "gx.h"

        .text
main:   set     BX_BUFFER, %r1          ! %r1 points to gx registers

        st      %r0, [%r1+GX_CMD]       ! open display
        ld      [%r1+GX_STATUS], %r2    ! load status word
wait:   cmp     %r2, 0
        be      wait                    ! wait until window is mapped
        ld      [%r1], %r2              ! load status word

        ! set up the command arguments
        st      %r0, [%r1+GX_LINE_X1]   ! x1 = 0
        st      %r0, [%r1+GX_LINE_Y1]   ! y1 = 0
        mov     511, %r2
        st      %r2, [%r1+GX_LINE_X2]   ! x2 = 511
        st      %r2, [%r1+GX_LINE_Y2]   ! y2 = 511

        ! now, issue the command
        mov     GX_LINE, %r2
        st      %r2, [%r1+GX_CMD]

        ! all done - the display will remain until you exit isem
end:    ta      0
As an example, Figure 8.4 illustrates a simple bitmap and assembly language declarations for the X11 representation of this bitmap.
You can use the ``bitmap'' program under X11 to create bitmaps and save their representation in a file. When you save a bitmap, the bitmap program generates C declarations for the bitmap. You can easily convert these declarations into assembly language declarations.
Write a program to draw a bitmap on the gx display. The gx device does not provide a simple way to copy bytes from standard memory to the device memory. You will need to ``draw'' the bitmap into the display memory, using GX_LINE commands. Your program should draw the bitmap with its upper left corner at position (0,0) of the display. You can test your program with the bitmap shown in Figure 8.4, but make sure you can also display bitmaps with widths that are not a multiple of 8. Figure 8.5 gives you another bitmap to display.